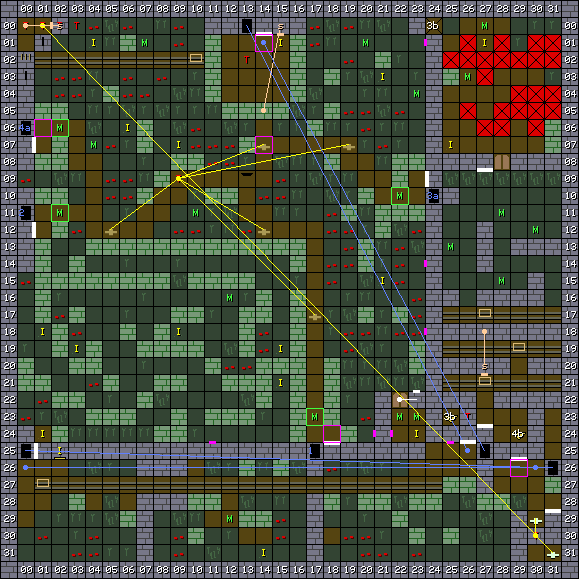
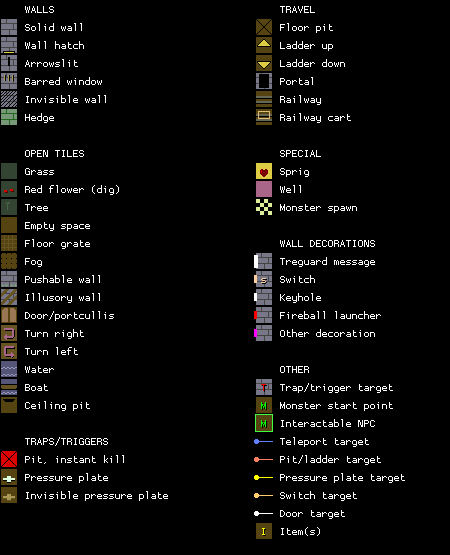
This is the initial map of Knightmare. See the notes below for introductory details about the game’s level layout.
Map

Key

Wall messages
| Coords | Message |
|---|---|
| X: 00 Y: 07 | QUEST FOUR THE CROWN OF GLORY |
| X: 00 Y: 12 | QUEST TWO THE CUP OF LIFE |
| X: 01 Y: 25 | YOUR CARRIAGE AWAITS YOU |
| X: 14 Y: 00 | YOUR QUEST STARTS HERE |
| X: 18 Y: 25 | QUEST ONE THE SHIELD OF JUSTICE |
| X: 24 Y: 09 | QUEST THREE THE SWORD OF FREEDOM |
| X: 26 Y: 24 | TAKE THIS SHORT CUT TO THE FOREST |
| X: 27 Y: 08 | BEWARE THE SWAMP |
| X: 27 Y: 24 | ENJOY YOUR RIDE |
| X: 29 Y: 25 | WELCOME TO YOUR KNIGHTMARE |
| X: 31 Y: 29 | RETURN THE CROWN HERE |
Items
| Coords | Item |
|---|---|
| X: 01 Y: 18 | 22: SWEET |
| X: 01 Y: 24 | 5f: IRON KEY |
| X: 02 Y: 25 | 41: BALL (x3) |
| X: 03 Y: 19 | 09: T-SHIRT |
| X: 04 Y: 01 | 22: SWEET |
| X: 06 Y: 06 | 22: SWEET |
| X: 09 Y: 07 | 13: SHORTS |
| X: 09 Y: 18 | 1b: SANDLES |
| X: 14 Y: 31 | 09: T-SHIRT (x2), 13: SHORTS (x3), 1b: SANDLES |
| X: 15 Y: 01 | 47: TWIG |
| X: 15 Y: 19 | 22: SWEET |
| X: 15 Y: 21 | 30: PENKNIFE |
| X: 21 Y: 03 | 30: PENKNIFE |
| X: 21 Y: 15 | 22: SWEET |
| X: 23 Y: 24 | 48: SPADE |
| X: 25 Y: 07 | 24: APPLE (x2) |
| X: 27 Y: 01 | 24: APPLE (x2) |
NPCs
| Coords | Monster | Defeated by | Drops | Text |
|---|---|---|---|---|
| X: 02 Y: 06 | 01: Tree | 39: SWORD OF FREEDOM | I HAVE LOST MY WEAPON | |
| X: 02 Y: 11 | 01: Tree | 46: SHIELD OF JUSTICE | I HAVE LOST MY COVER | |
| X: 17 Y: 23 | 01: Tree | 47: TWIG | 4b: WAND OF MAGIC | I HAVE LOST MY CHILD |
| X: 22 Y: 10 | 01: Tree | 5d: CUP OF LIFE | HAVE YOU SEEN MY CUP? |
Monsters
| Coords | Monster | HP | Number |
|---|---|---|---|
| X: 02 Y: 06 | 01: Tree | 2,000 | 1 |
| X: 02 Y: 11 | 01: Tree | 1,000 | 1 |
| X: 04 Y: 07 | 00: Goblin | 12 | 1 |
| X: 07 Y: 01 | 00: Goblin | 10 | 1 |
| X: 10 Y: 11 | 00: Goblin | 23 | 1 |
| X: 12 Y: 16 | 00: Goblin | 50 | 1 |
| X: 12 Y: 29 | 03: Troll | 70 | 1 |
| X: 17 Y: 23 | 01: Tree | 1,000 | 1 |
| X: 20 Y: 01 | 08: Pooka | 10 | 1 |
| X: 22 Y: 10 | 01: Tree | 1,000 | 1 |
| X: 22 Y: 23 | 03: Troll | 1,300 | 2 |
| X: 23 Y: 04 | 00: Goblin | 20 | 1 |
| X: 23 Y: 23 | 03: Troll | 4,300 | 2 |
| X: 25 Y: 13 | 20: Earth elemental | 300 | 1 |
| X: 26 Y: 03 | 20: Earth elemental | 235 | 4 |
| X: 27 Y: 00 | 20: Earth elemental | 235 | 4 |
| X: 28 Y: 11 | 20: Earth elemental | 300 | 1 |
| X: 28 Y: 15 | 20: Earth elemental | 300 | 1 |
| X: 30 Y: 12 | 20: Earth elemental | 300 | 1 |
Notes
There are eight maps in the game. Each is a 32 x 32 square area, automatically surrounded by solid walls on all sides. The starting forest area is one map, and each of the four quests (Shield, Sword, Cup and Crown) consist of one or more maps each.
All blocks take up a solid square. For example, the starting area appears to have two portals, one blocked by a hedge. In fact, they are just the same portal block viewed from different sides. Walls also occupy a full square. However, some blocks have something on one side, such as an item hatch, lever, message from Treguard, or a decoration.
The player starts the game on Map 0 at coordinates X: 19 Y: 26, facing south. The maps on this site are extracted from the game data and make the assumption that the top of the map is north; i.e. the coordinate X: 0 Y: 0 is top left, or northeast. (Quido’s Excel spreadsheet maps take the opposite direction as north, so they’re rotated 180 degrees.)
Additional start points are marked on the map where the player returns to the forest from other maps, such as by teleporter, pit, or ladder. The mysterious square hole in the sky, seen at X: 13 Y: 09, is how the player returns from the Shield quest, at coordinates X: 30 Y: 30 of that map.
The sign “ENJOY YOUR RIDE” mysteriously appears to face west in the map data (block type 08), but renders correctly facing south in the game.
A portal at the other end of the minecart line sends you to the north of the main forest area. The trigger at X: 13 Y: 02 is a mystery, as no switch sets it; the lever actually opens a gap in the hedge directly south.
This opens into a main area which primarily serves as a hub for the four main quests: Shield, Cup, Sword, and Crown. The dirt paths will guide you to them, but five invisible pressure plates located at points on the dirt paths will spawn a rabbit at X: 09 Y: 09. You can actually see the rabbit spawn in if you move quickly enough. The rabbits serve as an apparently unlimited supply of food.
If the right-hand section of the map seems unfamiliar, that’s because it’s inaccessible from the forest area. Instead, the final Crown quest incorporates segments stored in otherwise unused sections of other maps. A ladder from the second Crown quest level leads to Forest X: 29 Y: 24. The block at X: 26 Y: 23 beside a sign reading “BEWARE THE SWAMP” is cleared by a switch on the second Sword level (part of the Crown quest) between two spinners that rotate the player clockwise and inside a fake wall.
Another interesting feature of the Forest map is the top left corner, which is completely blocked off. This may be to prevent monsters wandering into coordinates X: 00 Y: 00, since zeroes are also used to mark empty monster slots, so a monster who enters 0,0 might disappear. This may also be why there is a minecart rail blocking off that section. There’s nothing special inside the top-left corner, but there is a switch on the left side which targets 0,0, and various other trigger references; technically, the trigger to win the game is on X: 02 Y: 00. The location may not be intended to be taken literally.
An iron key in the Forest opens the door on the bottom-right which contains very high hit points. The spade acquired here can be equipped to dig red flower patches for apples, but since the rabbits can be generated indefinitely, there’s not much point.
The tree guardians which gatekeep the four quests are not actually invulnerable to damage! They merely have very high hit points, and can be killed with patience, allowing you to sequence-break the game and keep the quest items.
« Back to index page